- Bandit0
- Bandit1
- Bandit2
- Bandit3
- Bandit4
- Bandit5
- Bandit6
- Bandit7
- Bandit8
- Bandit9
- Bandit10
- Bandit11
- Bandit12
- Bandit13
- Bandit14
- Bandit15
- Bandit16
- Bandit17
- Bandit18
- Bandit19
- Bandit20
- Bandit21
- Bandit22
- Bandit23
- Bandit24
- Bandit25
- Bandit26
- Bandit27
- Bandit28
- Bandit29
- Bandit30
- Bandit31
- Bandit32
- bandit33
- bandit34
This is the link for Bandit wargame.
Bandit0
The goal of this level is for you to log into the game using SSH. The host to which you need to connect is bandit.labs.overthewire.org, on port 2220. The username is bandit0 and the password is bandit0. Once logged in, go to the Level 1 page to find out how to beat Level 1.
Bandit1
The password for the next level is stored in a file called readme located in the home directory. Use this password to log into bandit1 using SSH. Whenever you find a password for a level, use SSH (on port 2220) to log into that level and continue the game.
Input: ls
Output: readme
Input: cat readme
Output: boJ9jbbUNNfktd78OOpsqOltutMc3MY1
Here we go, we get the password for bandi1. I know it’s weird to type every characters of the password. In fact, we could copy and paste the password when we log in by using Ctrl + Shift + V. It’s worth noting that my putty doesn’t work but the Secure Shell App from Google extension works.
Bandit2
The password for the next level is stored in a file called - located in the home directory
Input: ls
Output: -
Input: cat ./-
Output: CV1DtqXWVFXTvM2F0k09SHz0YwRINYA9
When “-“ is the filename, we have to tell the system that this “-“ is not the dash before parameters(for instance, cat -n 7 filename). Otherwise the system would wait for the input.
Bandit3
The password for the next level is stored in a file called spaces in this filename located in the home directory
Input: ls
Output: spaces in this filename
Input: cat "spaces in this filename"
Output: UmHadQclWmgdLOKQ3YNgjWxGoRMb5luK
Just like you have to add the quotes when you git add "xxx xxx.file", we need to do that to tell the system this is a name of a file rather than separated commands.
Bandit4
The password for the next level is stored in a hidden file in the inhere directory.
Input: ls
Output: inhere
Input: cd inhere/
Input: ls -a
Output: . .. .hidden
Input: cat .hidden
Output: pIwrPrtPN36QITSp3EQaw936yaFoFgAB
Basically, here we use the “-a” after ls to list all contents including the hidden files.
Bandit5
The password for the next level is stored in the only human-readable file in the inhere directory. Tip: if your terminal is messed up, try the “reset” command.
Input: ls
Output: inhere
Input: cd inhere/
Input: ls
Output: -file00 -file01 -file02 -file03 -file04 -file05 -file06 -file07 -file08 -file09
Input: cat ./-file07
Output: koReBOKuIDDepwhWk7jZC0RTdopnAYKh
It says the file is human-readable only, I just check every file using cat ./-file0x and it turns out “-file07” has the password for bandit5.
Bandit6
The password for the next level is stored in a file somewhere under the inhere directory and has all of the following properties: human-readable; 1033 bytes in size; not executable
Input: ls
Output: inhere
Input: cd inhere/
Input: ls
Output:
maybehere00  maybehere02 ...... maybehere19
Input: find -type f -size 1033c
Output: ./maybehere07/.file2
Input: cat ./maybehere07/.file2
Output: DXjZPULLxYr17uwoI01bNLQbtFemEgo7
Using find command with “-type f”, we can find file instead of directory (use “-type d”). Then with “-size 1033c”, we get files whose size is 1033 Bytes.
Bandit7
The password for the next level is stored somewhere on the server and has all of the following properties: owned by user bandit7; owned by group bandit6; 33 bytes in size
Input: cd /
change directory to the root
Input: ls -Rla | grep "bandit7 bandit6"
It returns a lot of lines, but we can find this line.
Output: -rw-r----- 1 bandit7 bandit6 33 Oct 16 2018 bandit7.password
Input: find -name bandit7.password
It returns a lot of lines, but we can find this line.
Output:./var/lib/dpkg/info/bandit7.password
Input: cat ./var/lib/dpkg/info/bandit7.password
Output: HKBPTKQnIay4Fw76bEy8PVxKEDQRKTzs
The ls command can be used with many parameters at once. The “R” means recursively find the sub-directories in addition to current work directory and the “l” means list the details of that file or folder.
Bandit8
The password for the next level is stored in the file data.txt next to the word millionth
Input: cat data.txt | grep millionth
Output: millionth cvX2JJa4CFALtqS87jk27qwqGhBM9plV
The password for bandit8 is cvX2JJa4CFALtqS87jk27qwqGhBM9plV.
Bandit9
The password for the next level is stored in the file data.txt and is the only line of text that occurs only once.
Input: sort data.txt | uniq -c | grep "1 "
Output: 1 UsvVyFSfZZWbi6wgC7dAFyFuR6jQQUhR
Or
Input: sort data.txt | uniq -u
Output: UsvVyFSfZZWbi6wgC7dAFyFuR6jQQUhR
Bandit10
The password for the next level is stored in the file data.txt in one of the few human-readable strings, beginning with several ‘=’ characters.
Input: cat data.txt | grep ====
Output: Binary file (standard input) matches
Input: strings data.txt | grep ====
Output:
2========== the
========== password
========== isa
========== truKLdjsbJ5g7yyJ2X2R0o3a5HQJFuLk
When I use the cat command, it prompts that the file is a Binary one. Then we should use strings command because it returns each string of printable characters in files. Its main uses are to determine the contents of and to extract text from binary files (i.e., non-text files). The introduction page is here
Bandit11
The password for the next level is stored in the file data.txt, which contains base64 encoded data
Input: cat data.txt | base64 -d
Output: The password is IFukwKGsFW8MOq3IRFqrxE1hxTNEbUPR
The base64 command can encode a string without parameter and decode that with “-d”.
Bandit12
The password for the next level is stored in the file data.txt, where all lowercase (a-z) and uppercase (A-Z) letters have been rotated by 13 positions
It’s basically Caesar Cipher in this challenge. However, I didn’t use my python script from last semester, cuz I want to try linux solution.
The tr command in UNIX is a command line utility for translating or deleting characters. It supports a range of transformations including uppercase to lowercase, squeezing repeating characters, deleting specific characters and basic find and replace. It can be used with UNIX pipes to support more complex translation. tr stands for translate.
Using tr command, we need to know what is the 14th letter of the alphabet (n). So it translate a to n, b to o and so on.
Input: cat data.txt | tr a-zA-Z n-za-mN-ZA-M
Output: The password is 5Te8Y4drgCRfCx8ugdwuEX8KFC6k2EUu
Bandit13
The password for the next level is stored in the file data.txt, which is a hexdump of a file that has been repeatedly compressed. For this level it may be useful to create a directory under /tmp in which you can work using mkdir. For example: mkdir /tmp/myname123. Then copy the datafile using cp, and rename it using mv (read the manpages!)
The file command can determine file type for a given file.
Input: cp data.txt /tmp/sf/sfile
Input: cd /tmp/sf
Input: ls
Output: sfile
Input: file sfile
Output: sfile: ASCII text
This file is a hexdump, so I have to do revert that transformation.
Input: xxd -r sfile reverted
Input: ls
Output: reverted sfile
Input: file reverted
Output: reverted: gzip compressed data, was "data2.bin", last modified: Tue Oct 16 12:00:23 2018, max compression, from Unix
So we change the file name and unzip that ‘gzip compressed data’.
Input: mv reverted reverted.gz
Input: gzip -d reverted.gz
Input: ls
Output: reverted sfile
Input: file reverted
Output: reverted: bzip2 compressed data, block size = 900k
So we change the file name to bzip2 compressed data and unzip it.
Input: mv reverted reverted.b2
Input: bzip2 -d reverted.b2
Output: bzip2: Can't guess original name for reverted.b2 -- using reverted.b2.out
Input: file reverted.b2.out
Output: reverted.b2.out: gzip compressed data, was "data4.bin"......
Again, we change the file name to gz cuz it’s gzip compressed.
Input: mv reverted.b2.out reverted.gz
Input: gzip -d reverted.gz
Input: file reverted
Output: reverted: POSIX tar archive (GNU)
The following process is basically the same, so I just screenshot the codes here.
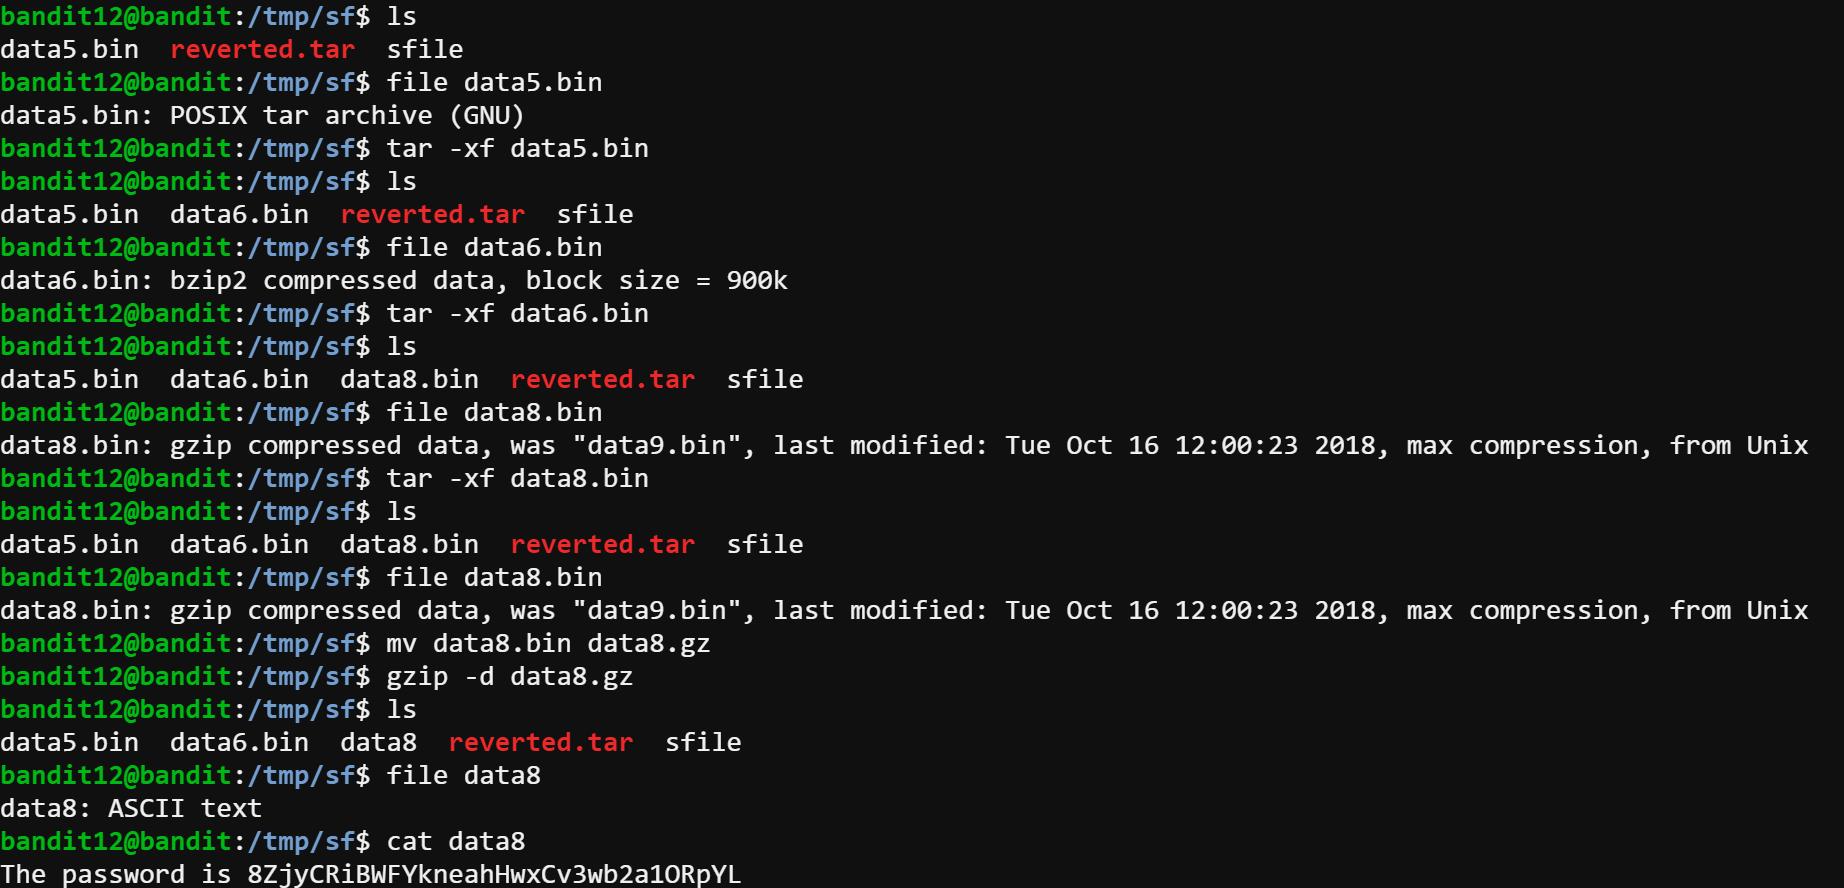
Input: cat data8
Output: The password is 8ZjyCRiBWFYkneahHwxCv3wb2a1ORpYL
Bandit14
The password for the next level is stored in /etc/bandit_pass/bandit14 and can only be read by user bandit14. For this level, you don’t get the next password, but you get a private SSH key that can be used to log into the next level. Note: localhost is a hostname that refers to the machine you are working on
Input: ssh -i sshkey.private bandit14@localhost
Input: cat /etc/bandit_pass/bandit14
Output: 4wcYUJFw0k0XLShlDzztnTBHiqxU3b3e
Bandit15
The password for the next level can be retrieved by submitting the password of the current level to port 30000 on localhost.
Input: cat /etc/bandit_pass/bandit14 | nc localhost 30000
Output: BfMYroe26WYalil77FoDi9qh59eK5xNr
We can use echo or cat to talk to server:30000. Useful resource here.
Bandit16
The password for the next level can be retrieved by submitting the password of the current level to port 30001 on localhost using SSL encryption.
Input: openssl s_client -connect localhost:30001
Output: CONNECTED(00000003).............---
Then we enter the password for the current level.
Input: BfMYroe26WYalil77FoDi9qh59eK5xNr
Output: Correct! cluFn7wTiGryunymYOu4RcffSxQluehd
Bandit17
The credentials for the next level can be retrieved by submitting the password of the current level to a port on localhost in the range 31000 to 32000. First find out which of these ports have a server listening on them. Then find out which of those speak SSL and which don’t. There is only 1 server that will give the next credentials, the others will simply send back to you whatever you send to it.
Input: nmap localhost -p 31000-32000
Output: as follows

As we can see from the screenshot, the port 31790 is open and other 1000 ports are closed. So we use openssl to connect to that port.
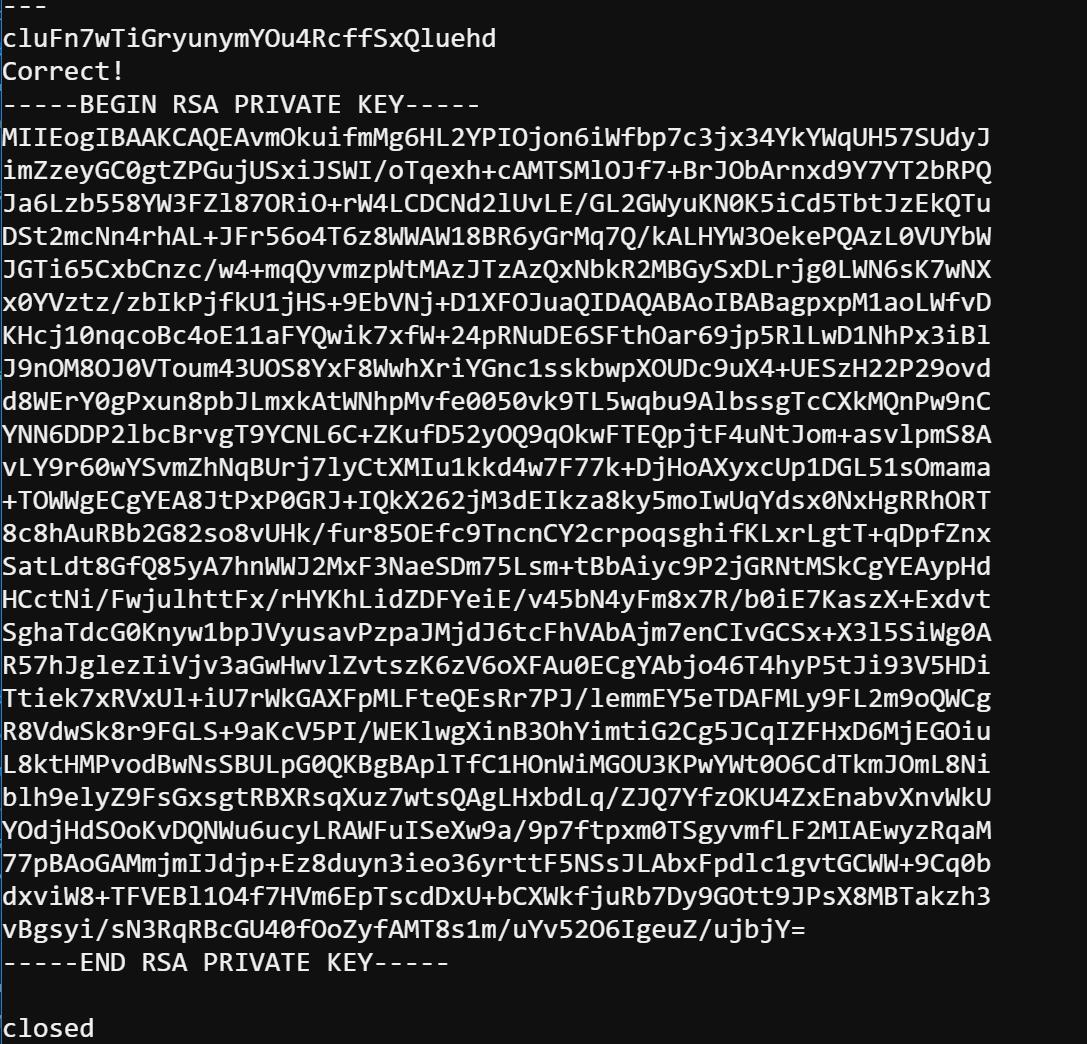
Because we cannot save file in the current folder, we need to change directory to /tmp/, and then we copy and paste the RSA key into a private key file. However when I input ssh -i rsakey.private bandit17@localhost, it prompts:

It says that we should not allow others to have right for this private key, with that saying, here is what I find useful for chmod command. I’d like to briefly introduce the chmod command: u for user (or the owner); g for group; o for others; a for all above; + adds the permission; - removes the permission; = makes the onley permission; r for read; w for write; x for execute.
Input: ssh -i rsakey.private bandit17@localhost
Output: Enjoy your stay!
Bandit18
There are 2 files in the homedirectory: passwords.old and passwords.new. The password for the next level is in passwords.new and is the only line that has been changed between passwords.old and passwords.new
In order to get the difference of two files, I referred to diff which is similar to git diff
Input: diff passwords.new passwords.old
Output: 42c42
< kfBf3eYk5BPBRzwjqutbbfE887SVc5Yd
---
> hlbSBPAWJmL6WFDb06gpTx1pPButblOA
The “<” symbol indicates that this line kfBf3eYk5BPBRzwjqutbbfE887SVc5Yd is from passwords.new, which means this string is the password for bandit18.
Bandit19
The password for the next level is stored in a file readme in the homedirectory. Unfortunately, someone has modified .bashrc to log you out when you log in with SSH.
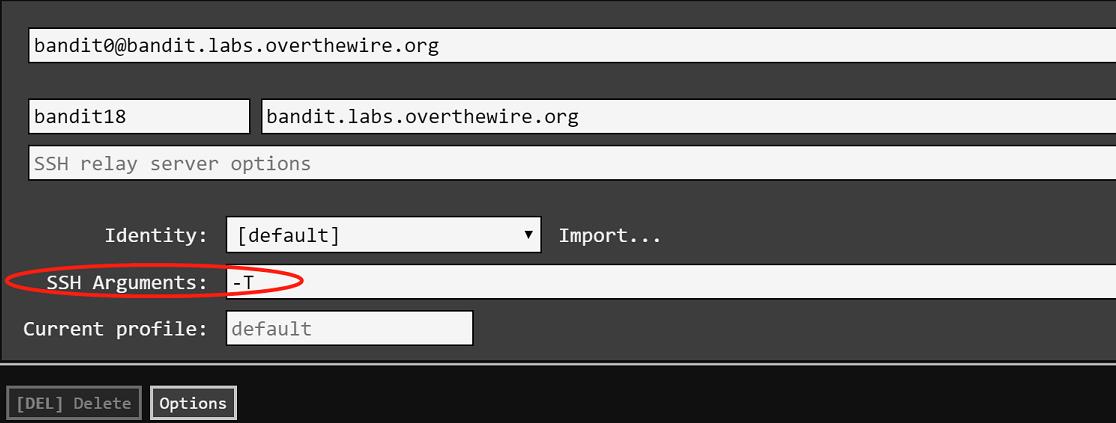
When I tried to login into bandit18@localhost, it says “Byebye” just after I logged in. So I searched on the Google and find this answer. Then, I add the argument here:

Input: cat readme
Output: IueksS7Ubh8G3DCwVzrTd8rAVOwq3M5x
It’s worth noting that the -t parameter opens a pseudo-tty( TeleTYpewriter, TTY), which might mean the .bashrc still runs when we open this session. However, we open the shell by typing /bin/sh as the input. I also tried to look for -t in the manual and I noticed that -T parameter can Disable pseudo-terminal allocation. I tried logged in using -T and I got the password as well, but I cannot see what I’m typing which looks like typing password in linux.

Bandit20
To gain access to the next level, you should use the setuid binary in the homedirectory. Execute it without arguments to find out how to use it. The password for this level can be found in the usual place (/etc/bandit_pass), after you have used the setuid binary.

The password is GbKksEFF4yrVs6il55v6gwY5aVje5f0j.
Bandit21
There is a setuid binary in the homedirectory that does the following: it makes a connection to localhost on the port you specify as a commandline argument. It then reads a line of text from the connection and compares it to the password in the previous level (bandit20). If the password is correct, it will transmit the password for the next level (bandit21).
After I logged into the bandit20 server, I tested the setuid binary file at first. It says This program will connect to the given port on localhost using TCP. If it receives the correct password from the other side, the next password is transmitted back. As it indicates, we need a port to listen to this setuid binary file. Then I reopen a ssh connection and open a port with -l which means listening. Also the -p 9999 means that the echo command will run on localhost:9999. There is no output for that, it’s like a service which keeps running until someone connect and say something to this port.
Input: echo "GbKksEFF4yrVs6il55v6gwY5aVje5f0j" | nc -l -p 9999
Then I went back to former ssh connection and run the binary file with port set to 9999.
Input: ./suconnect 9999
Output:
Read: GbKksEFF4yrVs6il55v6gwY5aVje5f0j
Password matches, sending next password
It looks like the binary file is sending next password, then I check the other ssh connection which runs port 9999 listening.
Output: gE269g2h3mw3pwgrj0Ha9Uoqen1c9DGr

As we can see from this connection session, the port was closed after receiving the password.
Bandit22
A program is running automatically at regular intervals from cron, the time-based job scheduler. Look in /etc/cron.d/ for the configuration and see what command is being executed.
As the goal indicates, I looked into the /etc/cron.d/ folder and list the contents. Because We’re in bandit22, let’s see what’s inside this file cronjob_bandit22.
Input: cd /etc/cron.d/
Input: ls
Output: cronjob_bandit22 cronjob_bandit23 cronjob_bandit24
Input: cat cronjob_bandit22
Output:
@reboot bandit22 /usr/bin/cronjob_bandit22.sh &> /dev/null
* * * * * bandit22 /usr/bin/cronjob_bandit22.sh &> /dev/null
It mentions /usr/bin/cronjob_bandit22.sh so I’m going to check it out.
Input: cat /usr/bin/cronjob_bandit22.sh
Output:
#!/bin/bash
chmod 644 /tmp/t7O6lds9S0RqQh9aMcz6ShpAoZKF7fgv
cat /etc/bandit_pass/bandit22 > /tmp/t7O6lds9S0RqQh9aMcz6ShpAoZKF7fgv
The /usr/bin/cronjob_bandit22.sh file save the password of bandit22 into temp folder.
Input: cat /tmp/t7O6lds9S0RqQh9aMcz6ShpAoZKF7fgv
Output: Yk7owGAcWjwMVRwrTesJEwB7WVOiILLI
So the password for bandit22 is Yk7owGAcWjwMVRwrTesJEwB7WVOiILLI.
Bandit23
A program is running automatically at regular intervals from cron, the time-based job scheduler. Look in /etc/cron.d/ for the configuration and see what command is being executed.
Just like bandit22, I tried looking into the /etc/cron.d/ folder and list the contents.
Input: cd /etc/cron.d/
Input: ls
Output: cronjob_bandit22 cronjob_bandit23 cronjob_bandit24
Input: cat cronjob_bandit23
Output:
@reboot bandit23 /usr/bin/cronjob_bandit23.sh &> /dev/null
* * * * * bandit23 /usr/bin/cronjob_bandit23.sh &> /dev/null
Input: cat /usr/bin/cronjob_bandit23.sh
Output: #!/bin/bash
myname=$(whoami)
mytarget=$(echo I am user $myname | md5sum | cut -d ' ' -f 1)
echo "Copying passwordfile /etc/bandit_pass/$myname to /tmp/$mytarget"
cat /etc/bandit_pass/$myname > /tmp/$mytarget
The file looks more complicated than bandit22, so I tried to run it first.
Input: /usr/bin/cronjob_bandit23.sh
Output: Copying passwordfile /etc/bandit_pass/bandit22 to /tmp/8169b67bd894ddbb4412f91573b38db3
As we can see from the output, it copies the bandit22 password file to /tmp folder. So if we want the bandit23’s password, we can tweak the myname in the script. That’s why I tried echo I am user bandit23 | md5sum | cut -d ' ' -f 1
Output: 8ca319486bfbbc3663ea0fbe81326349
As long as bandit23 had run this script, there should be that password file.
Input: cat /tmp/8ca319486bfbbc3663ea0fbe81326349
Here it is:
Output: jc1udXuA1tiHqjIsL8yaapX5XIAI6i0n
Bandit24
A program is running automatically at regular intervals from cron, the time-based job scheduler. Look in /etc/cron.d/ for the configuration and see what command is being executed.
Like the previous two bandits, we explore the script for bandit24.
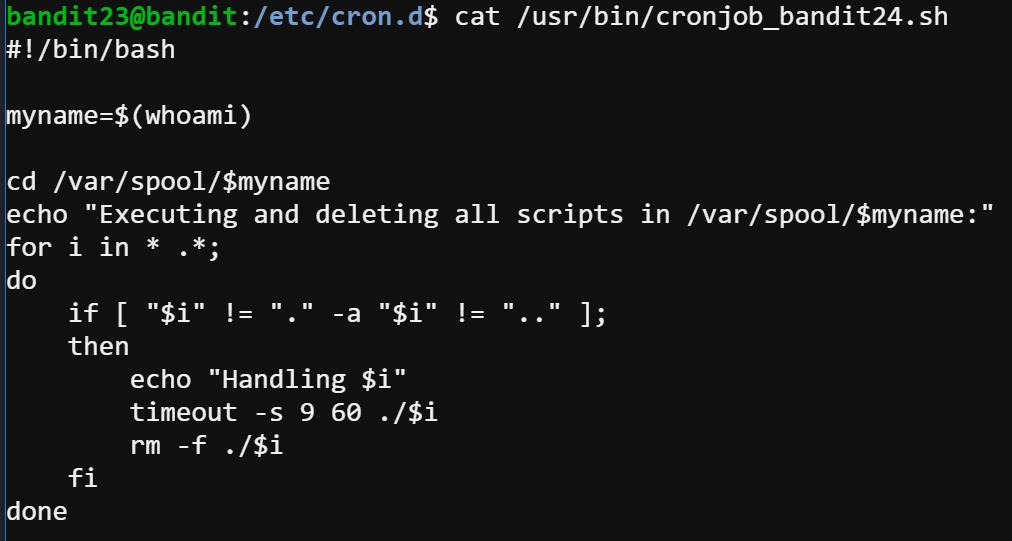
This level is interesting because we can actually see others creating their shell files. And more surprisingly, the scripts will be deleted once the automatic program runs at regular intervals from cron.
Basically, I copied the command from last level:
#!/bin/bash
cat /etc/bandit_pass/bandit24 > /tmp/bandit24sf/bandit24
After I paste the command into a shell file, I wait for the system to automatically run that script. However, nothing happened after 5 minutes. Then I tried to run this script under the current level to see what’s going on here and it prompts that “permission denied”. So I Googled the chmod details and find this blog very useful to help me memorize the linux permission commands. Hence, I changed the access code to chmod 777.
At first, I only tried to change the permission of the current shell file. But it still doesn’t create new file under the temp folder. Then I searched for other’s solution. So I noticed that I should also change the current folder to ensure that user bandit24 can write file here.
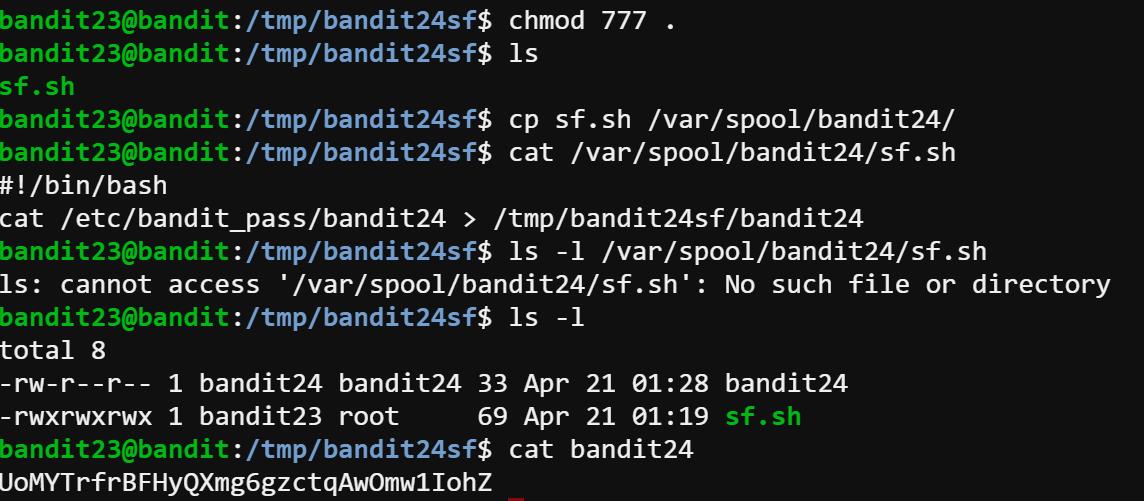
The password is UoMYTrfrBFHyQXmg6gzctqAwOmw1IohZ for bandit24.
Bandit25
A daemon is listening on port 30002 and will give you the password for bandit25 if given the password for bandit24 and a secret numeric 4-digit pincode. There is no way to retrieve the pincode except by going through all of the 10000 combinations, called brute-forcing.
In this challenge, we have to brute-force the ping at most 10000 times like it asked. In order to write a bash file, we have to change directory to /tmp. Because I didn’t have any experience writing a loop function in a bash file. I searched for “the equivalent python range function in bash”. This link shows we can do that using seq.
``
I waited for the script to brute force. The begin time is 10:54 a.m. The process looks very slow, I recommend an interesting Italian movie Quo vado? (2016). However, I found that the server disconnected when I was cooking for lunch. So I look for solutions to prevent disconnecting, but most of the solutions require permission to /etc/ssh/sshd_config. This method offers a good option for using nohup or screen command, and I re-run the script using screen, now the time is 2:20 pm.

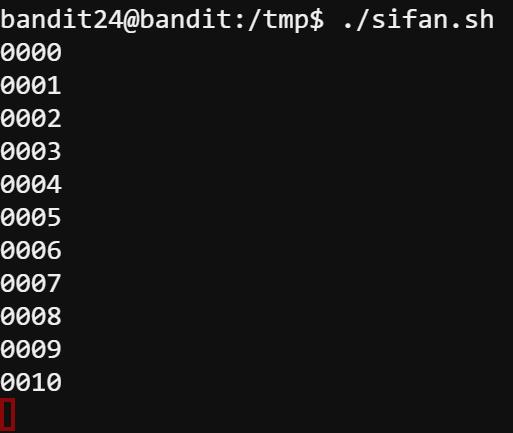
I had no idea what happened to that server, I still didn’t get the script running in the background after the ssh disconnected. So I write this python script to simulate the keyboard pressing the “Up” key and the “Enter” key to check the status of brute-forcing.
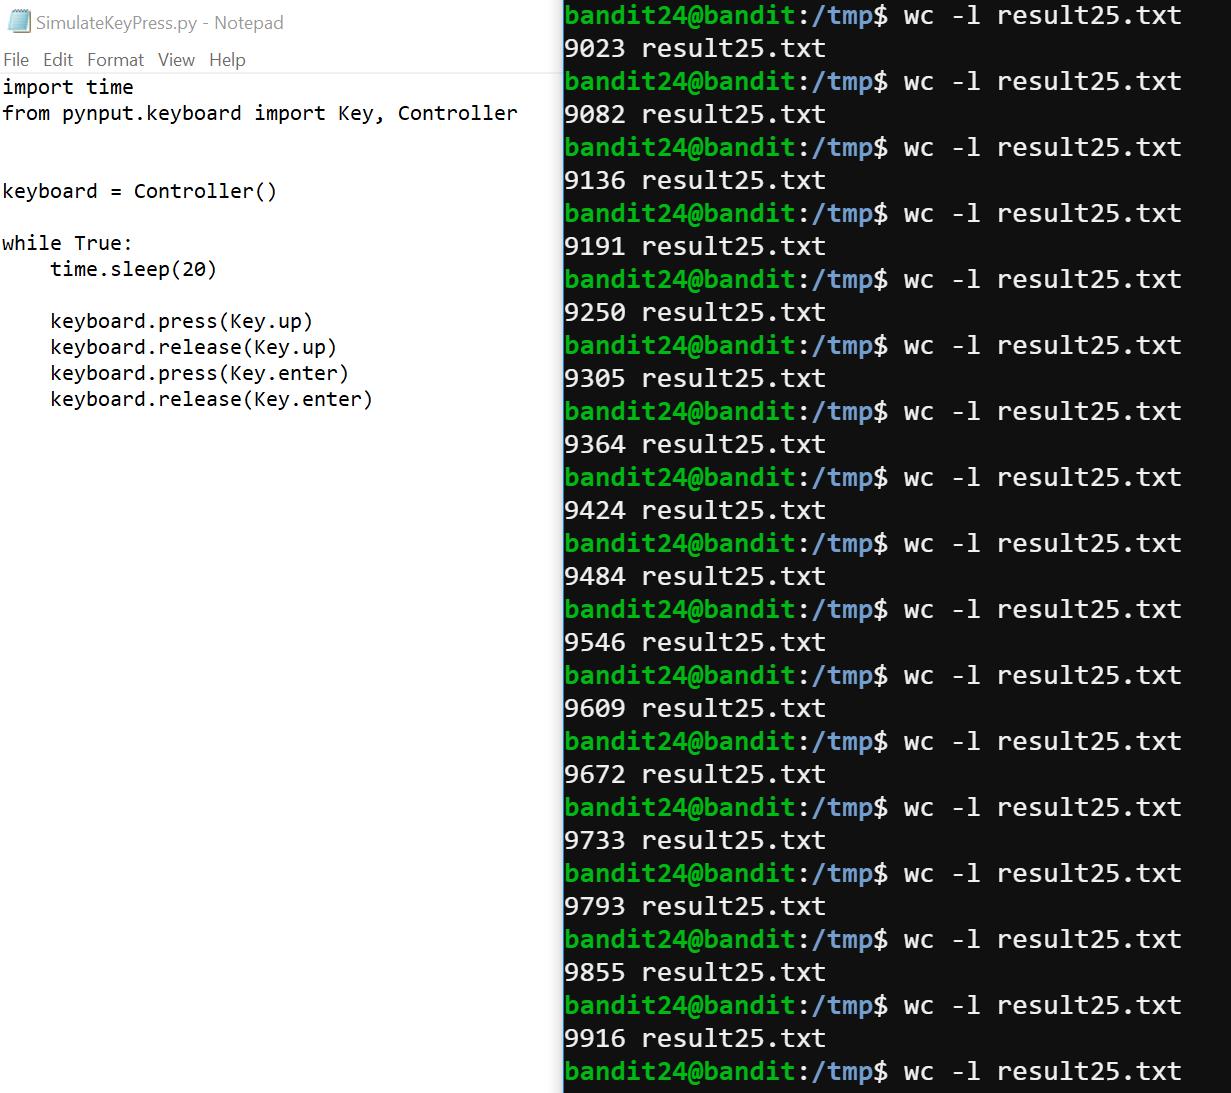
Even though I got the right pincode to access bandit25, I realize that I ignore the pincodes start with 0 (e.g. 0013). When I searched for how to implement that in Linux bash, I learned the usage of seq command and I found that we can actually use one line to get this job done.
After I wrote the script as follows:
seq -f "UoMYTrfrBFHyQXmg6gzctqAwOmw1IohZ %04g" 0000 10000 | nc localhost 30002 >> seq25.txt
The screen started flashing, then I realized that the old script was running slow because I only echo one line during every connection. But actually, we can input much more lines than that. I thought I could’ve got the password this time. However, this one-time connection only allows us to try 7178 times. I know it because I run this “count line” command wc -l seq25.txt | uniq -c. So I added another try seq -f "UoMYTrfrBFHyQXmg6gzctqAwOmw1IohZ %04g" 7000 10000 | nc localhost 30002 >> seq25.txt which gives me the right password for bandit25: uNG9O58gUE7snukf3bvZ0rxhtnjzSGzG.

Bandit26
Logging in to bandit26 from bandit25 should be fairly easy… The shell for user bandit26 is not /bin/bash, but something else. Find out what it is, how it works and how to break out of it.
Using ssh -i bandit26.sshkey bandit26@localhost, we can easily log in to bandit26 like the goal describes. But we’ll be logged out, so we need to check what shell is used in bandit26 instead of /bin/bash.
Input: cat /etc/passwd
Output:

Then we check what’s inside that file:
Input: cat /usr/bin/showtext
Output:#!/bin/sh
more ~/text.txt
exit 0
It’s worth noting that I also tried the same method as bandit19, but it doesn’t work due to the change of shell.
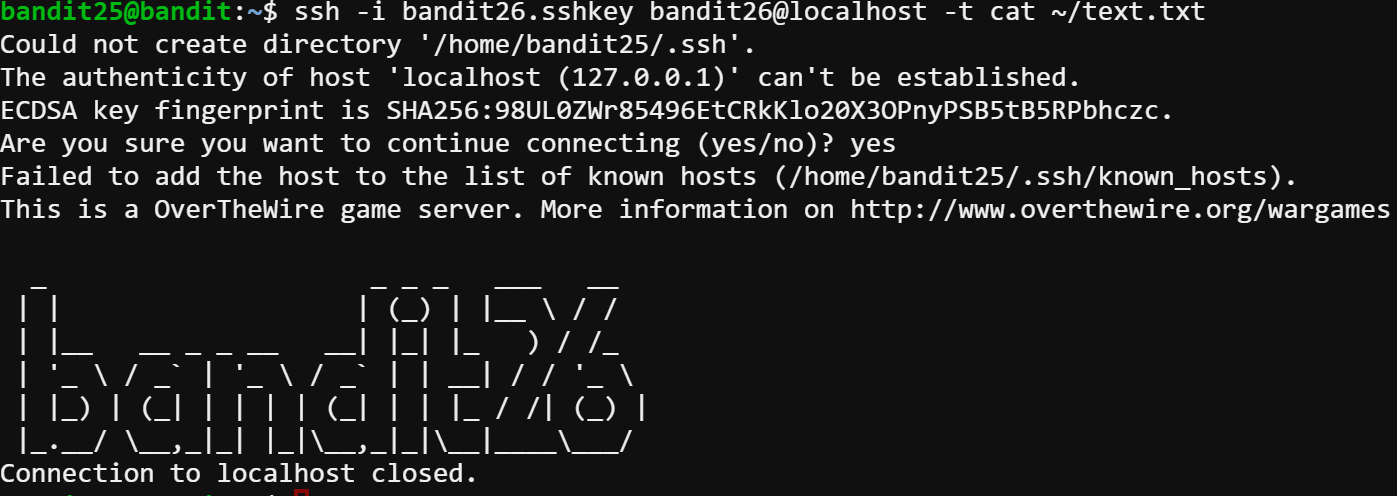
Since it uses command more which takes effect only when our window size is smaller than the full page. Hence, we resize the window and here it is.


As long as the more function is running, that’s to say, we’re still user bandit26 within the more function. Looking at the manual of more command, I found that we could read other files in the vim mode by pressing v and enter :e /etc/bandit_pass/bandit26 we get the password 5czgV9L3Xx8JPOyRbXh6lQbmIOWvPT6Z for bandit 26. However, getting this password does not allow us to normally log in to bandit26. Then I recalled the goal of this level is finding the shell. I find the usage of setting shell inside a vim editor here. Hence, after entering the vim mode, we could set the shell back to /bin/bash by running :set shell=/bin/bash and run :shell. Finally, we enter the shell as bandit26.

Bandit27
Good job getting a shell! Now hurry and grab the password for bandit27!
This must be the easiest level other than bandit0 for that we can literally grab the password for bandit 27. I just list the file in the current folder and then follow the my intuition.

The password is 3ba3118a22e93127a4ed485be72ef5ea.
Bandit28
There is a git repository at ssh://bandit27-git@localhost/home/bandit27-git/repo. The password for the user bandit27-git is the same as for the user bandit27.
I tried git clone ssh://bandit27-git@localhost/home/bandit27-git/repo but I get the “Permission Denied” error, which made me think that unlike https link, git clone command works differently in ssh link. But after I read many git documentations, I realized that my fault was attempting to write file in the ~ directory. I should’ve went to /tmp folder in order to write files. So I changed to /tmp folder, and I guess that someone may have already cloned the repository. Then I tried this.

It turns out that someone downloaded the repository but didn’t delete it. That’s actually annoying because it will cause a fatal error if others try to git clone in the same directory. Besides, lazy people like me will pass the git clone process. So I deleted this folder after get the password. :-) hahahahaha!
Input: cat README
Output: The password to the next level is: 0ef186ac70e04ea33b4c1853d2526fa2
Bandit29
There is a git repository at ssh://bandit28-git@localhost/home/bandit28-git/repo. The password for the user bandit28-git is the same as for the user bandit28.
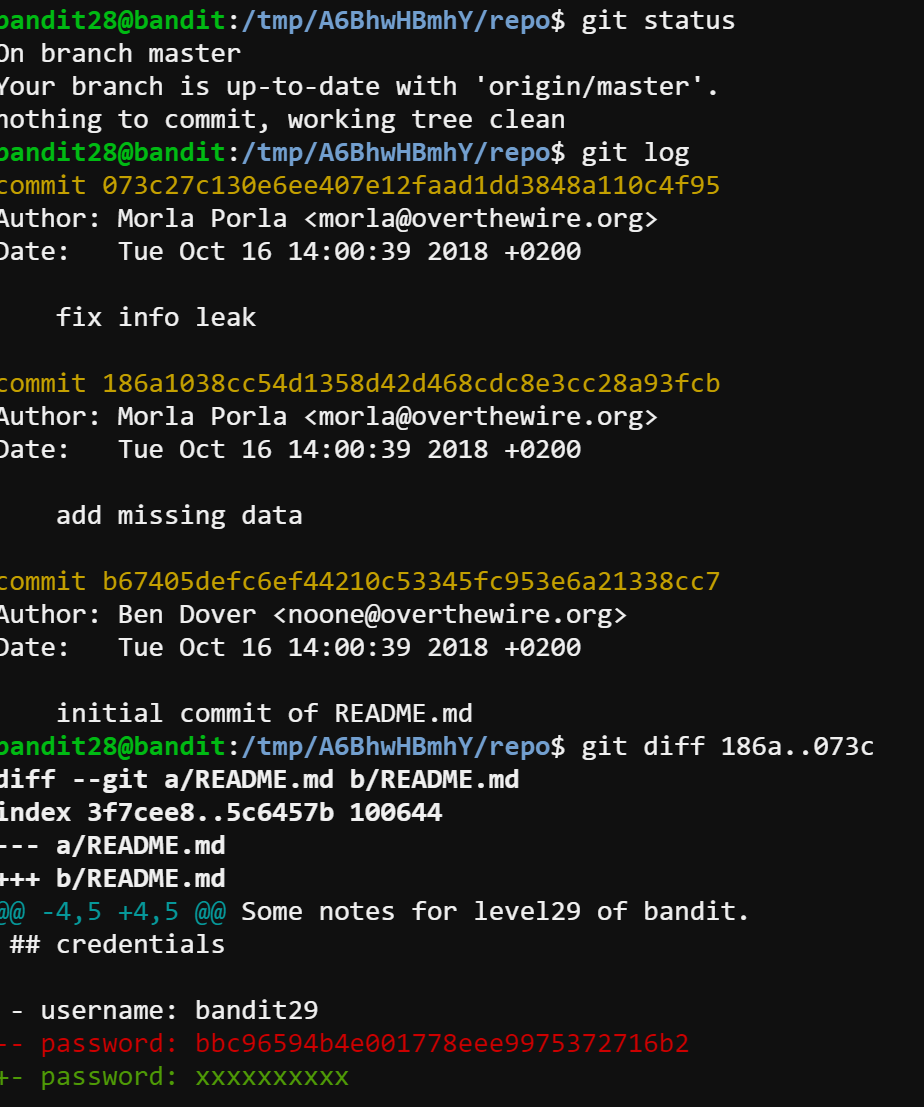
At first, I really thought the password was that 10 “x”. However, the server refused to serve that password. Then I checked the git log and noticed that “fix info leak” commit message, so I compare the difference between these two commits using git diff. Eventually, the password bbc96594b4e001778eee9975372716b2 shows up.
Bandit30
There is a git repository at ssh://bandit29-git@localhost/home/bandit29-git/repo. The password for the user bandit29-git is the same as for the user bandit29.
This time the README file looks different, but I still tried the former solution and it didn’t work. But this sentence password: <no passwords in production!> looks like a hint which might suggest that we can check other branches.
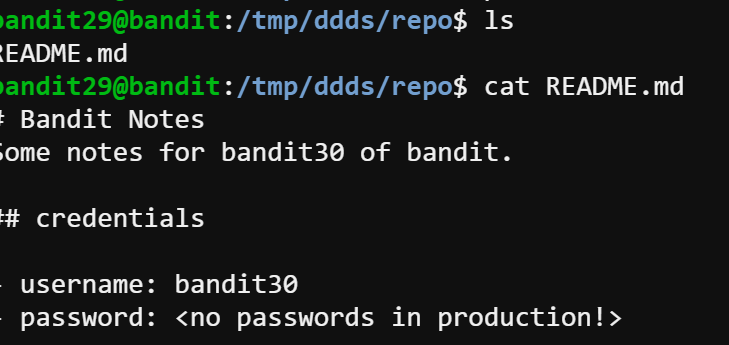
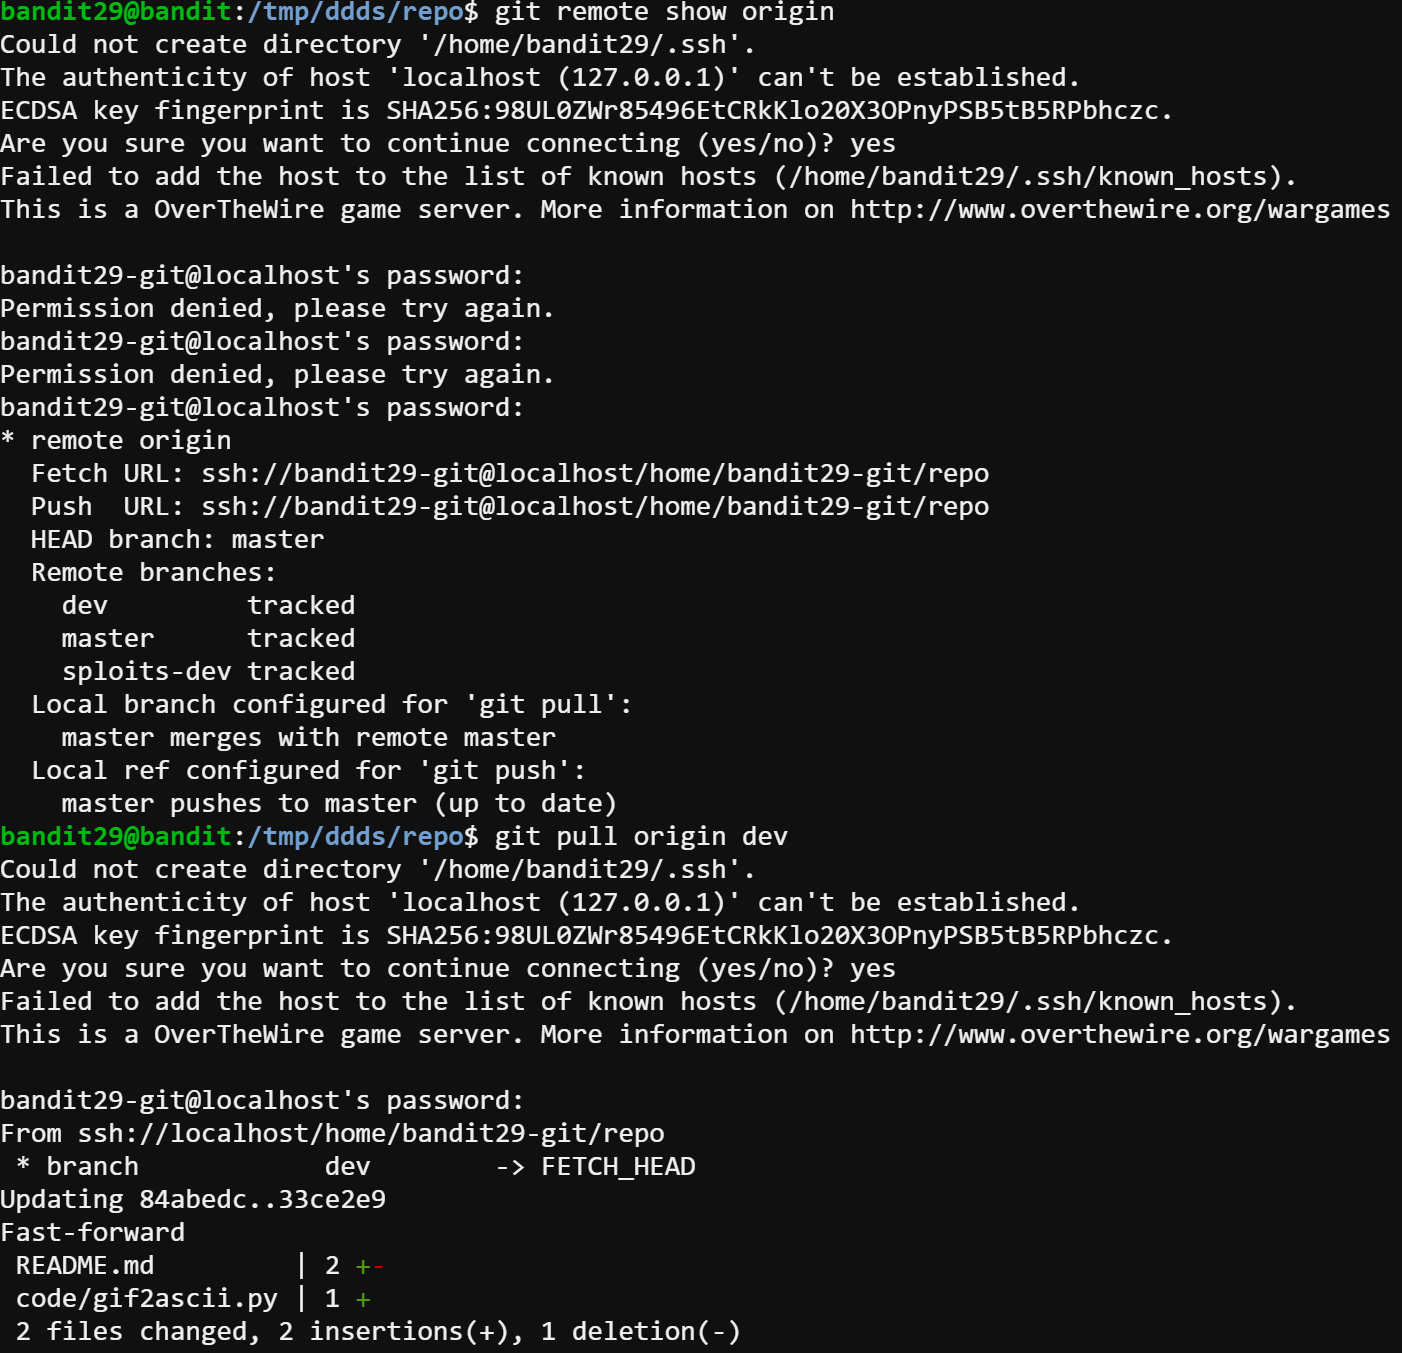
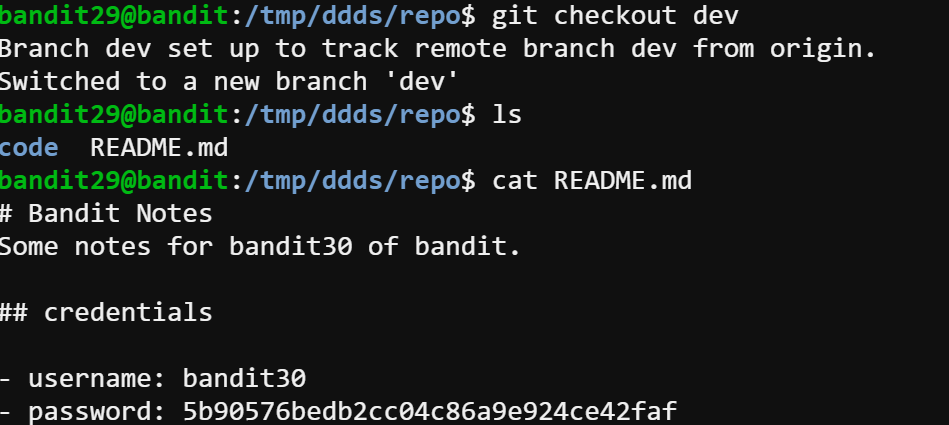
After git remote show origin command shows all the branches, I guess the password could exist in the dev branch. Hence, I git pull the dev branch and check it out.
Finally, we found the password in the dev branch. The password is 5b90576bedb2cc04c86a9e924ce42faf.
Bandit31
There is a git repository at ssh://bandit30-git@localhost/home/bandit30-git/repo. The password for the user bandit30-git is the same as for the user bandit30.
This time, I tried the same process as last one, but they didn’t bring me the password. Since the password must be inside this git repository and there is not so much space to hide. I tried git tag to show the tags and one tag called secret came up. Then I use git show to display the content. I’m not sure this is the password, but why not check it out?
Input: git show secret
Output: 47e603bb428404d265f59c42920d81e5

That password works!
Bandit32
There is a git repository at ssh://bandit31-git@localhost/home/bandit31-git/repo. The password for the user bandit31-git is the same as for the user bandit31.
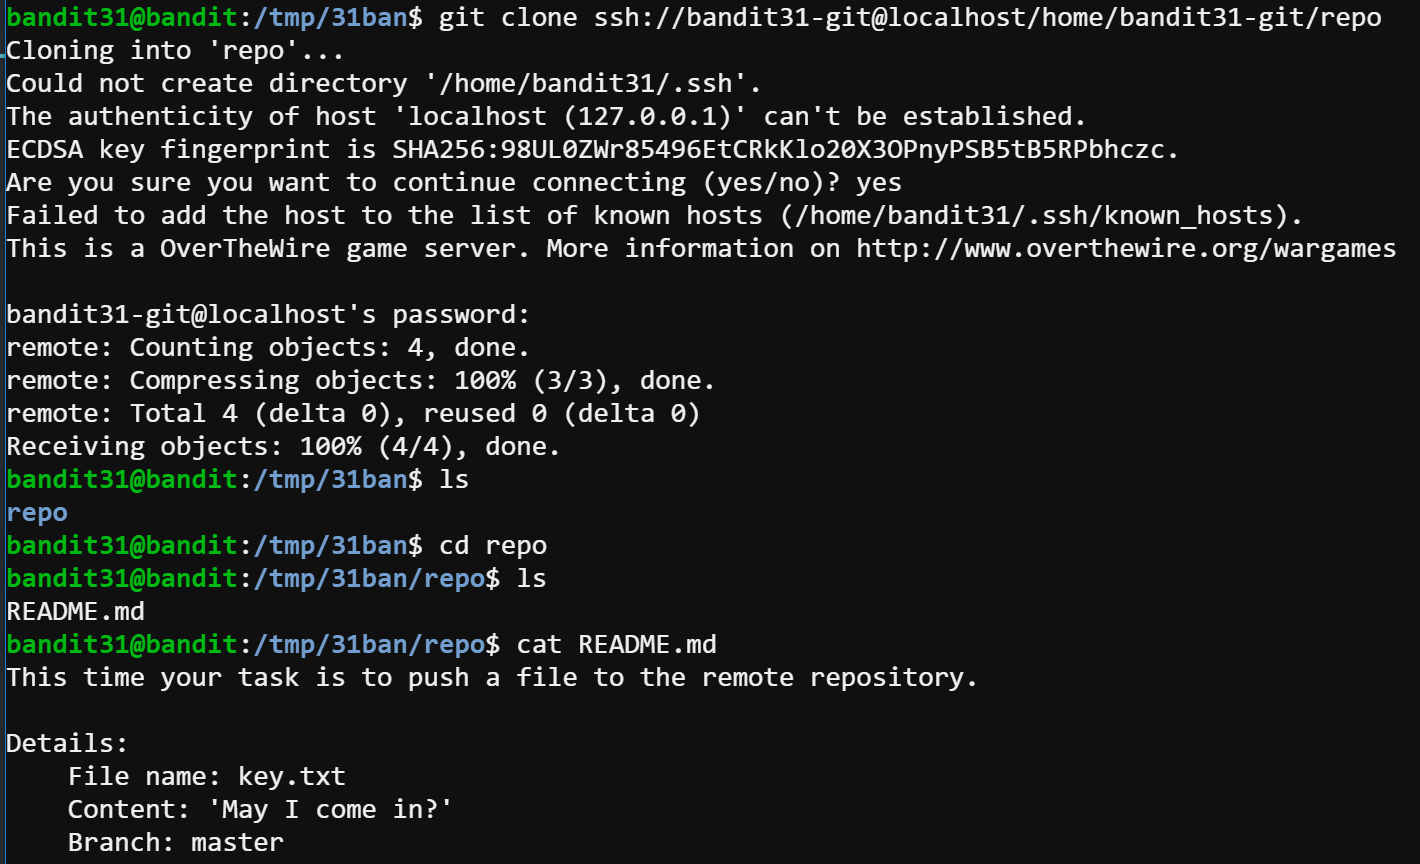
After I git clone the repository, I find this time it’s actually easier than the previous level. All it asked is to push a file to the remote repository. So I created a new file named key.txt with one line May I come in? and then git add with the parameter -f. After that, I commit the changes and push the stage to the remote by git commit and git push.
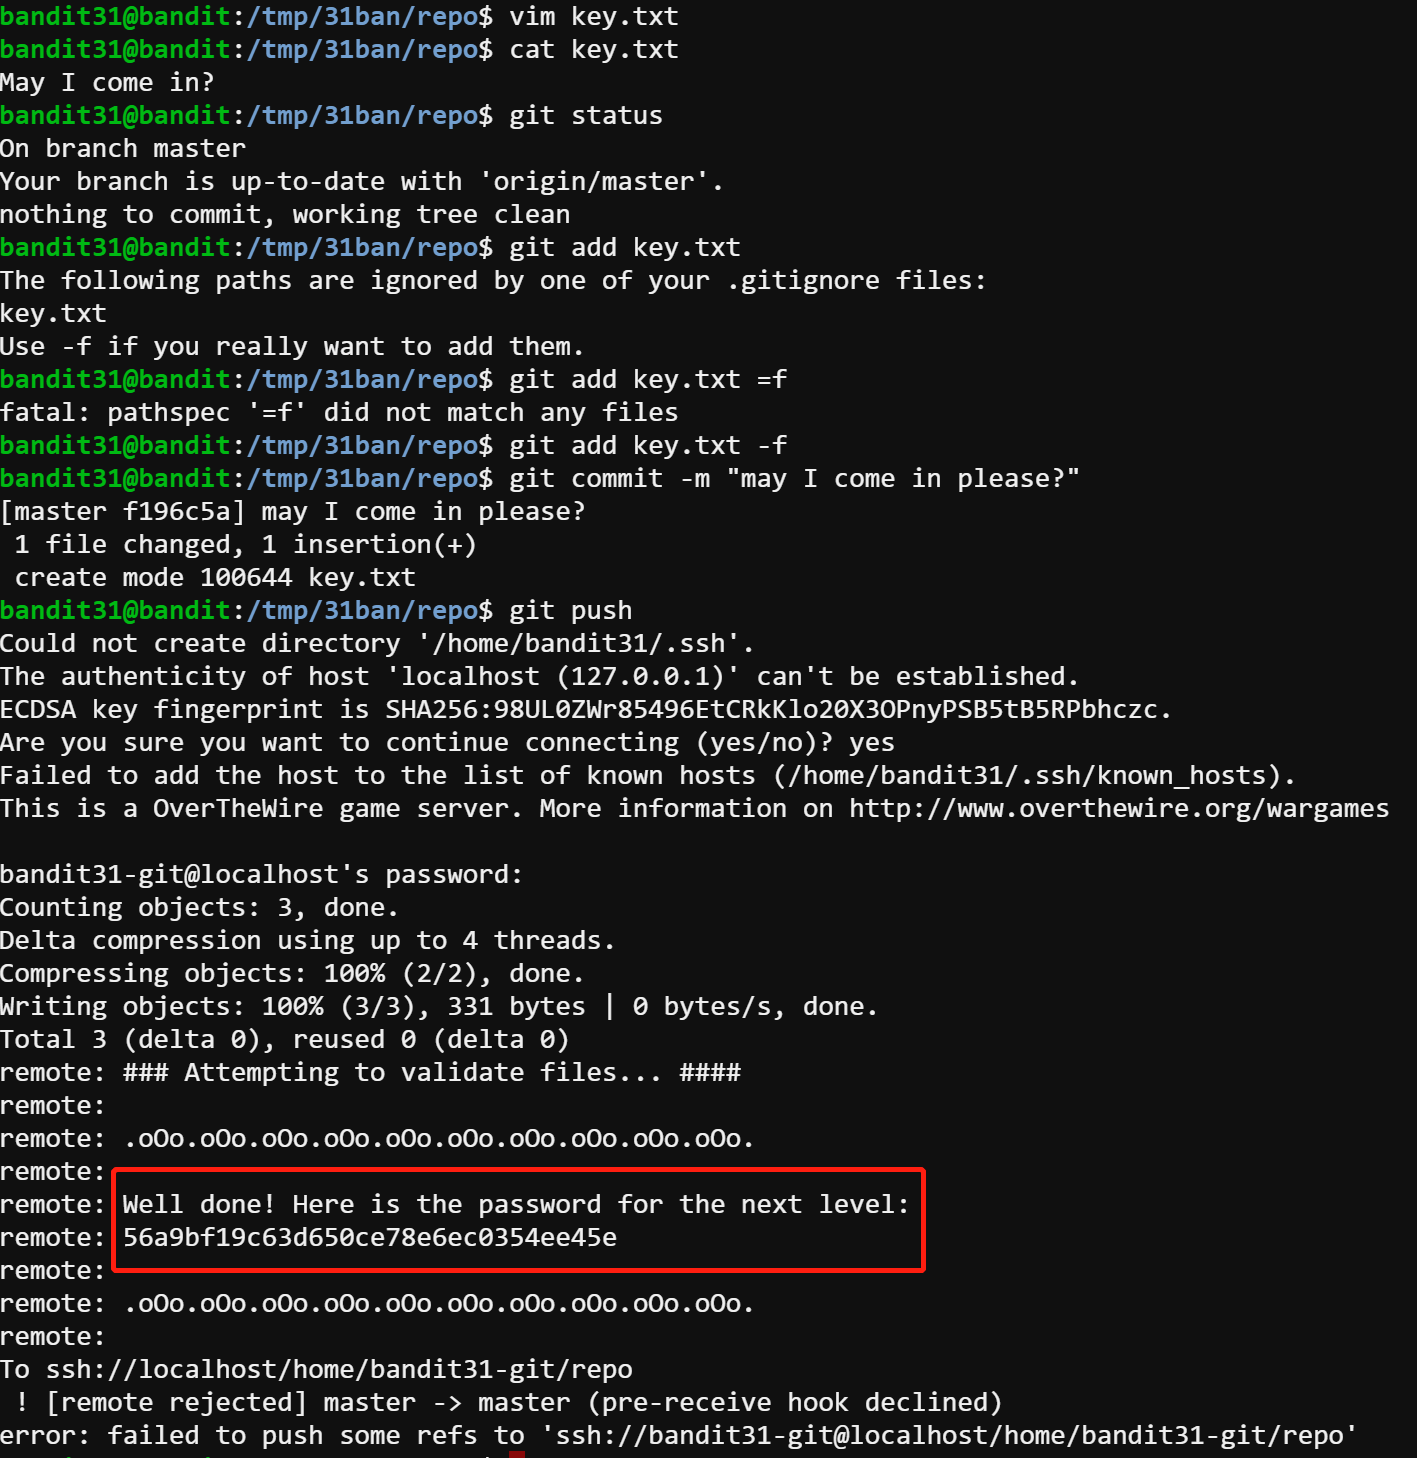
As the remote prompts, 56a9bf19c63d650ce78e6ec0354ee45e is the password.
bandit33
After all this git stuff its time for another escape. Good luck!
In the beginning, I thought there was something wrong with my client, because everything I typed became upper case like this.
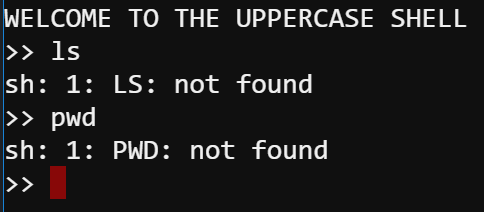
By doing some research (link), I found the $0 positional parameter command enable me to run commands as the sub-process of that upper case shell. That means we can get the cat command run inside this.
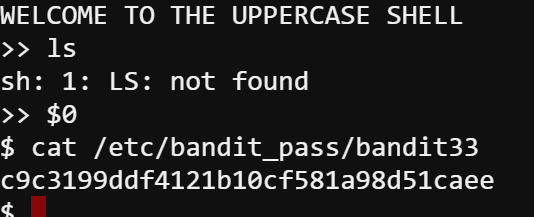
So the password for bandit33 is c9c3199ddf4121b10cf581a98d51caee.
bandit34
At this moment, level 34 does not exist yet.

Oh, yeah, all done! :-)
